Fishing Shell Beds| Fishing Shell Beds For Bass
One thing is certain: not all shell beds are made the same.
The key to bass fishing shell beds are: (1) looking for certain sorts of beds that have a greater likelihood to hold fish; (2) knowing when to fish shell beds throughout the year; and (3) understanding what baits work best.
Occasionally, if you visit any large lake you’ll see tons of shell beds… and… choosing where to start is overwhelming! And to make matters worse, most of the shell beds you’ll encounter may have the occasional fish near them, but the majority will have no fish at all.
To be blunt with you there are only two ways to become successful with fishing shell beds.
The old way is to spend hundreds (if not thousands) of hours on the lake fishing every single shell bed you come across – just hoping to catch a fish. But… for the majority of us we don’t have the time or the money to waste going that route, right?
The new way is to fish the shell beds in a surgical systematic way that can instantly give you the green light to start fishing and catching bass!
Now take a second to think about this… Can you imagine yourself having the confidence to pull up to any shell bed and instantly know whether it can be fished or not? Can you see how many more fish you can catch in one day just knowing that? Wouldn’t that be awesome?
Heck yes it would! Listen, If you ever got suckered into fishing at the wrong shell bed, you know it can be similar to being in a barren ghost town, wasting hours of your day, or forced to deal with a painful arm, or worse!
In our fishing blueprint, we’re going to help you avoid all that… let’s get started…shell beds
Key Takeaways
Thankfully, bass fishing has become second nature to me now… but that wasn’t always the case. As I spent thousands of hours watching and learning from my mentors, practicing hundreds of hours on the lake… only to fail horribly…
However, over years of honing my skill whenever I had the chance, I slowly started to create my personal shell bed fishing blueprint for beginners, which is kinda-like my private set of strategies and tactics. Now whenever I get to the lake I use my same blueprint and I can quickly pick out the best locations that are most likely to hold fish… which allows me to avoid wasting hours of my fishing day… would you like to know more? Great, here are just some of the things in this blueprint you’ll learn how to fish shell beds for bass:
- Understand what shell beds types are more likely to hold fish… and… which to avoid as fast as humanly possible!
- How your PC can get you extra bites when you’re on the water!
- How you can legally check to see if the shell beds attracts bass… even if the bed looks like the hundreds of others in the area… you will get your answer in less than 1 minute… and helps you avoid spending countless hours on the wrong fishing spot!
- The single best way fish a shell beds… this strategy will allow you to catch all the fish… never worry about spooking the rest… even if fish jumps off your hook!
- Learn the best one-two punch for making bass bite when your fishing shell beds – even Mike Tyson would be proud!
But be warned! Go through this blueprint slowly and carefully so you don’t miss any tips that could cost you.
Shell Bed Fishing Primer
Bass anglers know that there are prime spots to fish bass in lakes and rivers. Shell beds are the very top place to fish bass, according to anglers who fish them, and some anglers fish only shell beds.
Unlike fishing points, docks, laydowns, or other prime spots where bass hide, shell beds usually have a continuous supply of bass waiting to be hooked into. They are also great because schools of bass visit shell beds to feed.
Shell beds are random and are not structures or cover. They are piles of mussel shells on sand beds at the bottom of the lake or river.
Mussels stay in place and feed on the plankton that current brings to them. When they die, their shells can form a flat shell bed with a few or many shells.
Anglers can find shell beds at bodies of water all over the country when they know how to find them.
Step 1: Understand the Mussels Need To Survive
Mussels are not able to swim efficiently, so they must find food in the area where they stay for life. Nature has a perfect way for them to get the nutrition they need under these circumstances through areas with wind and the current in the lake.
Bass do not eat mussels, but they travel to shell beds to eat prey fish who are feeding in this area. Their instinct is to follow the prey to ensure a steady diet of shad, bluegill, and frogs.
There are other types of shell beds such as clam shell beds in some lakes in the country. Depending on the shell fish present in a lake, the crustaceans eventually die and leave empty shells in certain areas.
The first thing to know is that mussels always establish their spots where the water is high and has an incline. The high area is necessary for their survival so that their food in the water coming to them can feed them plankton, algae, and other nutrients.
Helpful Tip: The first thing to know is that mussels always establish their spots where the water is high and has an incline.
A shell bed eventually develops when mussels die and leave their empty shells. There may be a few shells on the bed, or many shells.
Shell beds are most frequently found on primary or secondary points that have the necessities of current and an incline for mussels to survive. Points near main river or creek channels with deep water nearby are spots where shell beds usually form.
Step 2: Find Quality Shell Beds
Unlike large topographic structures such as points, humps, or ridges, it can be very difficult to find shell beds on Google Maps or Google Earth because of their small size.
To make matters worse, you can’t find shell beds on Navionics either!
So what can you do next? Here’s the answer… find the best locations that are most likely to contain a shell bed.
Here are what I consider the 3 prime shell bed locations for beginners to fish… please note… there are more locations to learn, but I don’t want you to be overwhelmed. With that being said, if you’re going to be bass fishing shell beds, these have a better than average chance of holding bass. And they’re going to be:
- (A) Main lake points near deep water
- (B) Secondary points near channel swings
- (C) Windblown Points
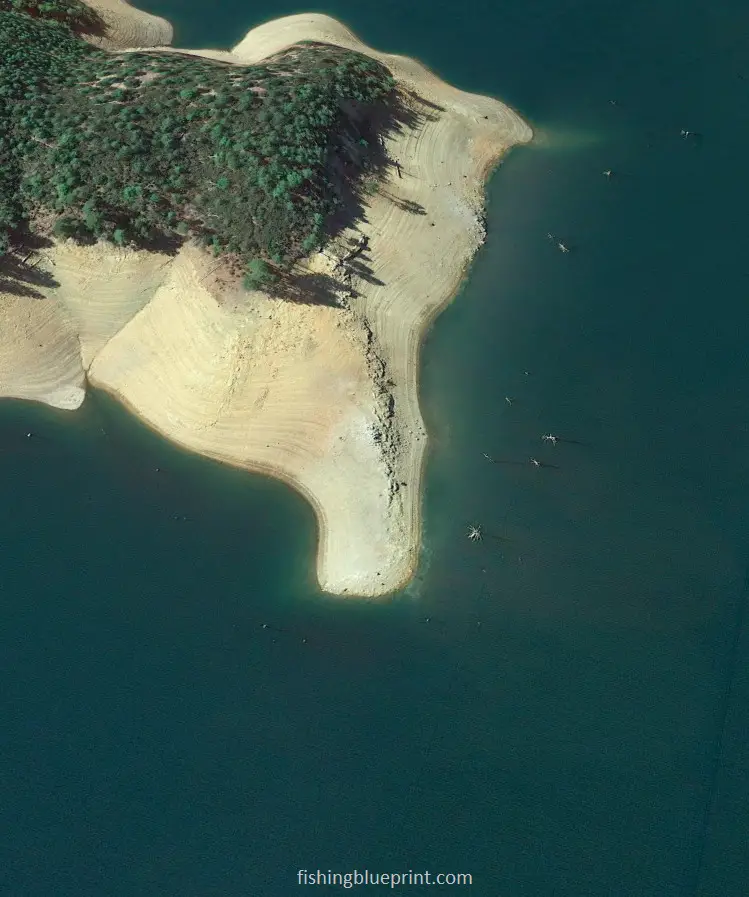
(A) Main lake points near deep water
Brush piles planted on main lake points are seldom visible from the water or on a contour map because they are typically planted in 15-30 feet of water.
The best points tend to have at least one side dropping quickly into deep water. Points like this are magnets for bass and their prey.
(B) Secondary points near channel swings
Bass will also relate secondary points, although more commonly in the fall in the fall and spring.
In the spring, bass begin to migrate into the coves to spawn. They have a tendency to stage on secondary points near channel swings during the pre-spawning or spawning phase.
(C) Windblown points
Wind blown points can be deep or shallow. As long as the wind is known to blow against the point there is a strong chance it is going to have a shell bed colony living on it.
Step 3: Identify the Shell Bed With Your Fish Finder
Anglers use fish finders to find the hardest bottoms in the lake. They also use them to locate points that may have shell beds.
A fish finder can help you locate shell beds if you know what to look for. The first step is to use a downward structure scan to see images of what is under your boat.
Step 1) I strongly suggest starting with a side scan first over the deepest section of the tip point.
Step 2) Once you identify the bed, motor over it and scan it with your 2D sonar and structure scan looking for bait and bass.
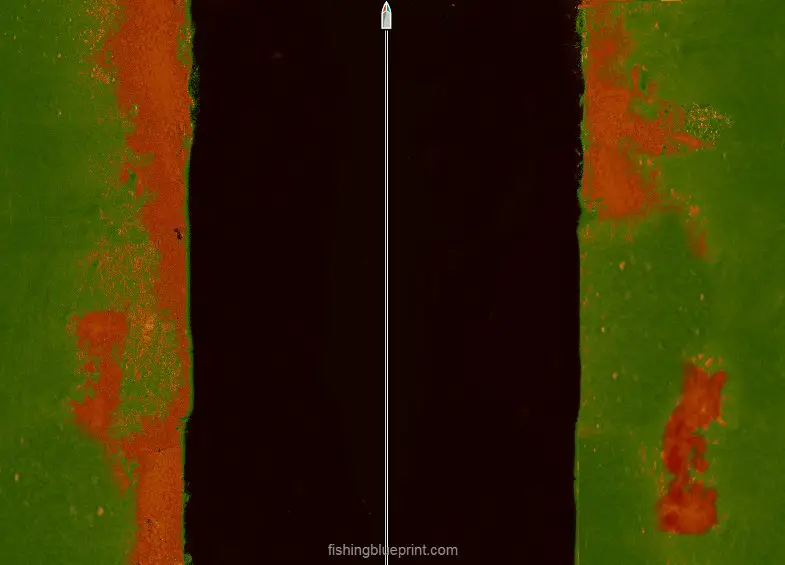
Below is an example of how to scan for a shell bed.

Now you did your homework and researched where to find shell beds. This example is a main lake point with a sharp drop into deep water.
So you get to the lake. Step 1 start side scanning the area…
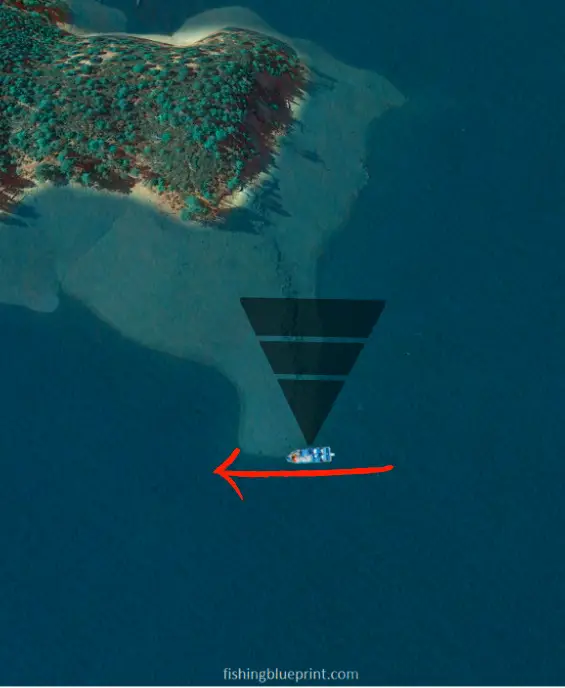
This is what it should look like with your side scan sonar (image below).
Side imaging is helpful in finding shell beds and may be the most important type of scan that you do. Shell beds light up on the screen and appear to have holes on the bottom.
A fish finder has the ability to help you find the hardest lake bottoms where shell beds are usually located.
One of the biggest tips I can educate you on is to use opposite/contrasting colors to highlight the hard bottom versus the soft parts of the bottom.
A great example for this I learned from Justin at the Fish The Moment YouTube video.
He taught me an easy trick to find shell beds is to change the colors on your fish finder. The Hummingbird model uses red and green to indicate hard bottoms (red) and soft bottom spots (green).
Ya… when I switch to this setting it looks like Christmas threw up on my fish finder, but it really does make the hard bottom pop in color… so now I can easily identify it.
A way to tell if brighter spots are rock piles or shell beds is to realize that rock piles have shadows. Shell beds are flat and so they have no shadows.
Examine bright spots that appear on your fish finder to see if they have shadows or not. If the area does not show dark shadows, then you have probably found a shell bed.
If you have doubts about whether you have located a rock pile or a shell pile, throw a Carolina rig with a one-ounce weight and drag it across this area. If it is a shell pile, it will feel like bumps with sand- paper on them.
BUT WORD OF WARNING!!!…
Shells on the lake bottom often make a brighter return to your fish finder.
Rocks show up in the same manner, so it can be difficult to differentiate between the two… and that brings us to our next steps
2D and Downward Scan
When it comes to scanning for shell beds using your 2d sonar is going to be your best bet… let me tell you why…
Using your 2D sonar your primary goal is to verify if the bottom is harder than the areas surrounding it.
Yes… you could also see balls of baitfish; like shad. Schools of shad will appear like a group of small floating dots.
You may also see bass which will appear as arcs. Usually they are positioned in a horizontal line and do not stack up more than two or three fish above another one.
Helpful Tip: You may also see bass which will appear as arcs. Usually they are positioned in a horizontal line and do not stack up more than two or three fish above another one.
Your downward structure scan can help you determine if the hard bottom is either rocks (which would appear as larger bumps), or shells (which are relatively flat)
you and the area looks like a good spot, then switch to you structure scan and 2D sonar
Start by driving back and forth over the shell bed.
Take note if there are any bait or bass that are located near the bed.

Finding Active vs. Inactive Fish
When scanning shell beds you want to see the bass on top, or very close to is. This signifies the bass are actively feeding. These fish are extremely catchable anytime they are relating directly on top of point, best of all you can typically catch them using an assortment of lures.
Look at the images below. This is a downward scan image I recreated to show you what bass look like when they’re relating to shell bed… they are the large arcs. The smaller dots represent baitfish like shad.
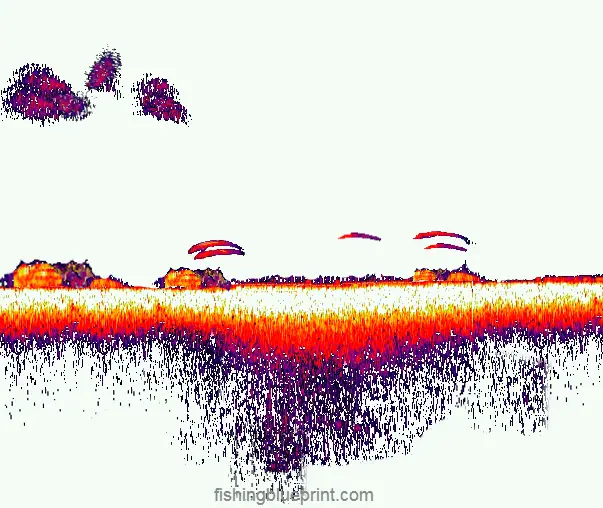
Important to remember: If the bass will suspend above the deeper water, off to the side, it means they are not actively feeding and will be harder to catch.
Step 4: Fishing The Shell Bed Systematically
Fishing a shell bed for bass is not difficult. To fish shell beds, you must know where they can be found once you arrive at the lake.
You need a plan of where to go first, next, and so on. If you follow these easy steps, you will be jaw-jacking lots of bass at the shell bed.
1) Location, location, location. The right location is everything when fishing shell beds. Idle areas we discussed earlier; main lake points near deep water, secondary points near channel swings, windblown points… these areas will given you the best chances of finding a shell bed.
Shell beds can be difficult to locate, and it takes practice to find them in a lake. Once you learn to identify them, it becomes easy. You must actively look for shell beds because they are rarely accidentally found.
Contour lines on maps show the changes in the lake’s bottom structure and the water depth.
There are also small areas on the shoreline of main or secondary channels that hint that a shell bed could be below. They are small areas that jut out into the water and they have a steep incline.
Additionally, you will need to find areas where there is current, or if the area has the potential for current. This could be at a swing or secondary point with an incline.
If you’re unsure if what you are looking at is a shell bed, throw out a football jig or a Carolina rig and drag it over the lake bottom.
You can get a feel if this area has shells, and you will feel the friction of sand as you move over the lumps that are in this flat area.
Sometimes you’ll even catch a mussel that will clamp down on your bait as you’re slowly dragging it over bed shell… this usually indicates that you are casting into a shell bed.
2) Mark the bed with a marker buoy 10-15 yards off to the side. And then make your cast. Once you catch a fish from the shell bed immediately drop another marker buoy or safe a waypoint on your fish finder unit. That way after you land the fish you can line up the boat exactly how it was when you caught the first fish.
But Wait!
I want you to know something before you just go start fishing the bed… be prepared to spend some time on the shell bed. The best way I can describe when I fish a new shell bed is the same way I fish a new laydown. It’s fished meticulously.
Through my thousands of hours of learning from the best anglers… I learned they are systematic when fishing new shell beds (hence why I wrote this blueprint)!
If the bass are located on or near the shell bed you are safe to assume they are actively feeding and they will readily respond to your bait.
Experienced anglers have found that once they have jaw-jacked one bass, the likelihood of hooking into more is increased. Keep fishing the shell bed because you will probably get more bites.
3) Fishing the edges first, then work your way to the heart of the shell bed. Starting on the shell bed edges you’ll most likely pick off some of the more smaller and aggressive bass. This is a good way to fill your live well.
Then, slowly start working your way into the middle of the shell bed. This is were you will most likely catch the biggest fish.
Once I start catching the bigger fish on the shell bed, that is when I’ll drop my second marker buoy.
The biggest and best fish will often be found in one smaller area on the shell bed… so you have to precise with your follow up casts to catch those other big bass.
4) Start with using a moving bait. Bass live near shell beds nearly all year long. For this reason, moving baits would easily draw the attention of the bass and lure them easily towards you.
Fast moving baits such as crankbaits, spinnerbaits, Chatterbaits, and umbrella rigs are excellent baits to start your shell bed fishing with.
5) Slow it down to pick off the more reluctant bass. If you’re not getting any bites from the fast moving baits it will be time to slow it down.
The bait I strongly recommend you start with if the bite is slow is to use a tungsten football jig. Here’s why…
Tungsten is a denser material than lead which means you get a heavier weight in a smaller package. Tungsten is nearly twice as hard than lead, and is about ½ the size of a lead jig,
The smaller sizes also means less drag… which also means it has a quicker fall rate for the same sized lead jig.
Lastly, since it’s more compact there is less chance for hangups.
My second or third choice for baits are going to be Texas rigged compact soft plastic creature baits such as a brush hog, a drop shot, a Texas rigged worm, or even wacky rigged Senko are excellent choices.
And yes, I’ll thread on a tungsten bullet weight for my Texas rigs the same reason that I outlined above.
6) And finally, be stealthy. During the process of scanning and then fishing shell begs, try to be as quiet as possible. If the shell bed is shallow, or the water is clear the fish may get spooked.
You might not necessarily have to be quiet, but let the noise be steady. Do not rev your engines and maintain a steady rpm.
More Shell Bed Fishing Tips...
At certain times of the year such as when the water is still cold, bass may leave the shell bed only to return shortly.
Other bass may suspend in the deeper water and wait until the environmental conditions improve.
Keep fishing so you do not miss bass when they return. If you have continued for ten or fifteen minutes and have not hooked into more bass, move on to the next shell bed.
Since there are deep water shell beds and shallow water shell beds, you will need to use different techniques in the shallow water.
You can use swimbaits, crankbaits, and Chatterbait in shallow water.
Choose bait and lures that looks like the prey fish bass are pursuing like shad or bluegill.
Step 5: Picking the Best Baits For Shell Bed Fishing
Your fishing trip might succeed or fail based upon your choice of baits. After learning from some of the top anglers in the world and spending years fishing shell beds, I devised and formed the best baits into a simple method… and… I still employ it now!
I start with reaction baits to pick off the most aggressive bass. The baits I know work are (1) deep-diving crankbaits, (2) soft plastic swimbaits, (3) Chatterbaits, (4) umbrella rigs.
Then I’ll switch between a football jig, soft plastic creature bait, Texas rigged large (10+ inch) worms, and a Senko after the feeding frenzy begins to quiet down.
If you’re good at fishing lake bottoms, you might want to try alternative slower presentation techniques like the shaky head, weedless wacky rig, or weedless drop shot.
Fast fishing is typically the best method since it keeps the fish interested and increases the likelihood that they will attack your bait.
My Personal Notes: My 2 Biggest Problems with Fishing Brush Piles
I got to be honest with you… me and shell beds… it’s a love-hate relationship! Maybe not so much anymore since I developed this blueprint for fishing shell beds.
When I was first getting started, my biggest frustration was trying to find where the shell beds are located in the lake or river I was fishing in.
As I mentioned before in previous articles, I have ADD… and it’s tough for me to be trolling for hours graphing not finding anything… It was maddening!
It wasn’t until I learned where on the lake gave me the best chances of finding a shell bed. If I did my homework correctly and studied my maps, it really reduces the time on the water dedicated to finding those shell beds.
In Summary: Study your maps, scan systematically, fish meticulously, stay versatile.
Another frustration I often got was mixing up pea gravel or small rock beds for shell beds.
To help me solve this I developed my scanning blueprint for shell beds… this would narrow down 95% of the locations and tell me if it was a shell bed, or not… and then… if I was still on the fence whether it was a shell bed or gravel, I would simply throw out a Carolina rig or an extra heavy football jig to “feel” the bottom composition.
A third thing that still frustrates me is when I finally found a shell bed and there are no bass there.
I would spend all that time finding a shell bed and go to find out there is no bass there. When I encounter this situation I jokingly tell myself, “the bass are out to lunch or are taking a smoke break”, and I’ll come back in an hour or two.
I had to remember that fishing shell beds are not a lucky one-time catch. They have a continual number of bass feeding there all throughout the day and year.
I’m not perfect… I’ve made a ton of mistakes on my journey learning how to get started with fishing shell beds effectively. I had to go through countless hours of trial and error for me to be able to finally create a blueprint that I could use any time I get to the lake.
I hope you see how this fishing blueprint can help you too.
Take care and tight lines.
–George.
-- Featured Article Of The Month --
Want To Learn Where To Catch More Bass? Checkout These Articles...
- Bass Fishing CREEKS The Easy Way (In Less Than 10 Minutes)
- Warning: Bass Fishing HEAVY GRASS? [15+ Mistakes To Avoid]
- Bass Fishing POINTS in 5 Quick & EASY Steps!
- Complete 5-Step DOCK Fishing Formula
- Bass Fishing LAYDOWNS [Complete Guide + Pictures]
- Little Known Pattern for Fishing TREES for Bass.. Now and Forever
- Complete Formula For BASS FISHING ROCKY BANKS & RIPRAP
- The 5 TRUTHS about Bass Fishing BRIDGES and Avoid Wasting Time On Techniques That Don’t Work!
- Bass Fishing BRUSH PILES To Catch The Most Bass In Minimum Time!
- The 7-step Secret Formula for Bass Fishing LEDGES – Even a Complete Fishing Noob Can Use and Be 100 Times More Potent Than the Best B.A.S.S. Professional!
- The Single Best Guide to Fishing SHELL BEDS… and… Do It Fast!
- 5 Basic Elements Of Fishing HUMPS AND RIDGES No One is Talking About!
- 5 Crucial (and Unusual) Tactics You Must Do When Bass Fishing ROADBEDS!
- Top 25 Summer BANK Fishing Tips (Never Get Skunked Again)
- [EXPERT REVEALS] Bass Fishing In MUDDY WATER Secrets – 27 Tips & Mistakes To Avoid Today!
- 31 Best Tips for Bass Fishing At NIGHT (Complete Guide)
Other Bass Fishing Articles Just For You...
Funny Fishing Rules, Laws, and Regulations 2025
Crazy Fishing Laws That Will Blow Your Mind! #7 is INSANE! Strange Fishing Regulations and Laws As silly as hook and rod limits may seem,
EXPOSED! How To Use A Spinnerbait The Right Way for 2025
Are You Wondering How To Use A Spinnerbait? Or How To Work A Spinnerbait Over Grass, Logs, or Points? Well, All These Questions Are Answered
EXPOSED! Best Crankbait Colors for 2025 [Which to Buy & Avoid]
What color crankbait to use? Crankbait Color Chart I just love going into a Bass Pro Shops store and just staring at all the walls
Best Underwater Dock Lights For Fishing – 2025 Buyers Guide
Night Dock Light Fishing For Beginners Dear fellow angler, Does this sound like you? You’re someone who loves fishing but just wants to escape the
15 Best Deep Diving Crankbaits [2025 Buyers Guide – Which to Buy & Avoid]
A Complete Buyer’s Blueprint On The Best Deep Diving Crankbaits for Bass, Walleye, or Striped Bass On The Market Today Fishing deep diving crankbaits can